%
m
#
FIELD-SUPPLIED MOTORS - Factory-installed
motor mounting bracket for 48 frame motors will
not fit 56 frame motors. When replacing 48 frame
motor with 56 frame motor, use mounting bracket
for 56 frame motor.
Indoor Air Fan Adjustment — See Caution
mentioned earlier. Fan motor pulley is factory set
for fan speed shown in Table 1.
TO CHANGE FAN SPEED
1. Shut off unit power supply.
2. Loosen fan belt by loosening fan motor from
mounting bracket. Do not loosen fan motor
mounting bracket from unit. See Fig. 2.
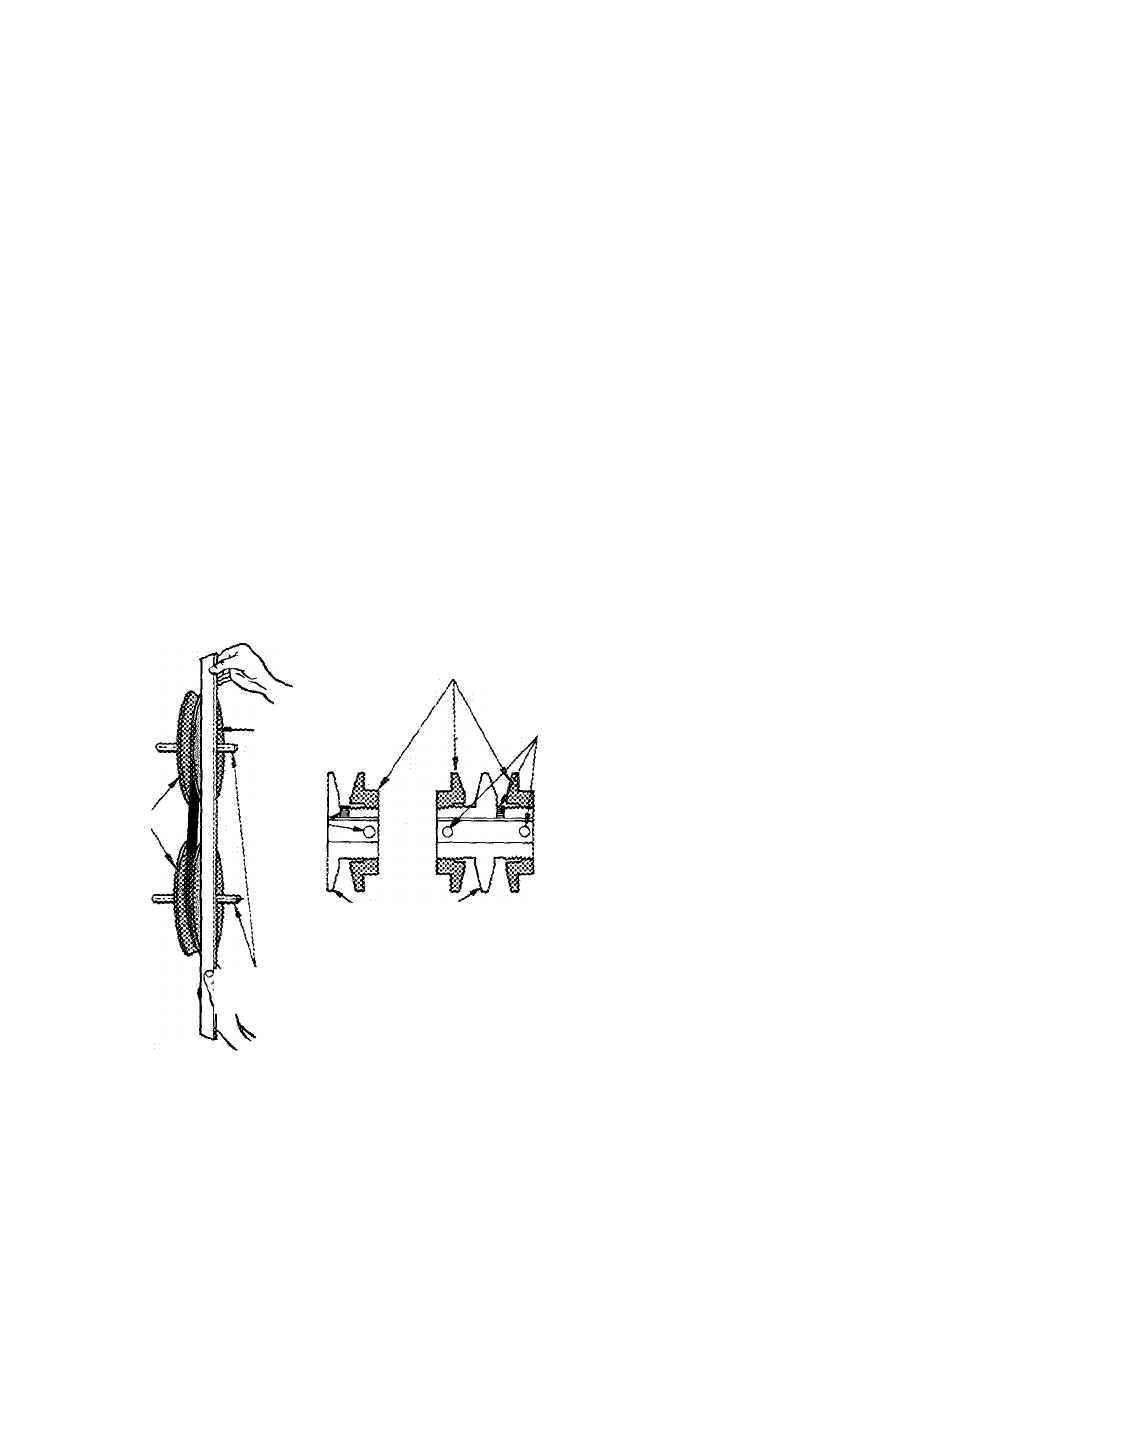
3. Loosen movable pulley flange setscrew (Fig. 5).
4. Screw movable flange toward fixed flange to in
crease fan speed and away from fixed flange to
decrease speed using values shown in Table 1. In
creasing fan speed increases load on motor. Do
not exceed maximum allowable fan speed ( Table
1) or motor full load amps indicated on motor
nameplate and Table 2.
5. Set movable flange setscrew at nearest flat of
pulley hub and tighten setscrew.
6. Check Pulley Alignment and Belt Tension Ad
justment as described later.
7. Check fan operation. Repeat above procedure
as required.
MOVASuE flanges
PULLEYS
SETSCREWS
STRAIGHT EDGE MUST,
8£ PARALLEL
W!TH saj
s£Tsa?Ews-
FIXED FLANGES
SINGLE-GROOVE TWO-GROOVE
« MOTOR a FAN SHAFTS
R MUST BE parallel
Fig. 5 — Indoor Air Fan Pulley Adjustment
PULLEY ALIGNMENT - Loosen fan motor
pulley setscrews and slide fan pulley along fan
shaft. Make angular alignment by loosening motor
from mounting bracket. See Fig. 2 and 5.
BELT TENSION ADJUSTMENT - Loosen fan
motor from mounting bracket. Do not loosen
motor mounting bracket from unit. Move fan
motor up or down until proper belt tension is
achieved (approximately 3/4-in. deflection with
8-lb tension at midpoint of belt span).
Fan Motor Lubrication — See Caution mentioned
earlier. Factory-installed fan motor is factory lubri
cated and requires no lubrication for first 5 years of
operation. Clean and reoil bearings with SAE 10 W
oil annually thereafter. If heating coil is installed,
oil the bearings every 6 months. Field-installed fan
motors should be lubricated according to instruc
tions furnished with motor.
Fan Shaft Lubrication — See Caution mentioned
earlier. Bearings are factory-lubricated, rubber-
mounted ball bearings and require no lubrication.
Return Air Filters — Inspect filters twice monthly
and replace as often as required depending on
operating conditions. Size and type filters are
shown in Table 1. If cleanable filters are used, flush
them with hot water or steam or soak in a mild
solution of soap or detergent and water. Rinse and
allow filters to dry before reinstalling. Refer to
filter manufacturer’s instructions as applicable. Do
not operate unit without return air filters in place.
Refer to Service, Access Panel Removal and Return
Air Grille Removal described earlier as required.
Condensate Drains — Clean drain line and unit
drain pan at the start of each cooling season. Check
flow by pouring water into drain. Be sure trap is
filled to maintain an air seal.
Evaporator Coil — See Caution mentioned earlier.
Remove dirt and debris from evaporator coil as
required. Clean with a stiff brush, vacuum cleaner
or compressed air. Use a fin comb with teeth of
correct spacing (15 fins/in.) when straightening
mashed or bent coil fins.
Water-Cooled Condenser may require cleaning of
scale (water deposits). Condensers are best cleaned
with an inhibited hydrochloric acid solution such
as Oakite 32. Acid will stain hands and clothing
and attack concrete. Without inhibitor, it will
attack steel. Cover surroundings to guard against
splashing. Vapors from vent pipe are not harmful
but take care to prevent liquid from being carried
over by the gases. Warm solution acts more readily
but cold solution applied longer is just as effective.
GRAVITY FLOW METHOD (Fig. 6) - Do not add
solution faster than vent can exhaust generated
gases. When condenser is full, allow solution to
remain overnight, then drain condenser and flush
with clean water. Follow acid manufacturer’s
instructions.
FORCED CIRCULATION METHOD (Fig. 7) -
Fully open vent pipe when filling condenser. Vent
may be closed when condenser is full and pump is
operating. Regulate flow to condenser with supply
line valve. If pump is nonoverloading type, valve
may be fully closed when pump is running.
For average scale deposit, allow solution to
remain in condenser overnight. For heavy deposits,
allow 24 hours. Drain condenser and flush with
clean water. Follow acid manufacturer’s
instructions.
Air-Cooled Condensers — Periodically inspect and
clean depending on operating conditions. Refer to
Start-Up and Service Instructions pertaining to
air-cooled condenser used.
Crankcase Heater (50BB only) — Heater in unit
prevents refrigerant from condensing in compressor
oil while compressor is off. Heater is energized
whenever unit main power is on, but is de
energized when compressor starts. Do not shut off
unit main power supply for an extended period
 (8 pages)
 (8 pages)
 Manymanuals.com
 Manymanuals.de
 Manymanuals.fr
 Manymanuals.it
 Manymanuals.pl
 Manymanuals.cz
 Manymanuals.es
 Manymanuals-pt.com
Comments to this Manuals